Friday 4 July 2014

Resizing photographs for projection

Whether you are a professional photographer, keen hobbyist or member of a camera club, if you want to project your photo's using a digital projector then it is a good idea to know how to resize your images.

The application used for the screen shots in this article is Adobe PhotoShop CS6 but all image editing software has the ability to resize an image.


PhotoShop Fit on Screen menuThe reason for re-sizing

The resolution of digital projectors is much lower than modern cameras - in other words they cannot match the level of detail of your camera - and so they display a scaled version of the image. This is exactly the same as if you choose "Fit on Screen" (or similar) in your photo editing software. The image is downscaled in real time by the operating system or application to match the available viewing area of your monitor or projector.

In order to get the best reproduction of your photograph - whether to projector, screen or print - you should resize it to the native resolution of the output device (or as close as possible depending on your photo's aspect ratio). Camera clubs will usually specify the "resize resolution" of images for competition and this will, hopefully, closely match the resolution of the club's projector.

The benefit of resizing - or scaling - the image yourself is the amount of granular control you can take of both the final image size and the algorithms used to do the re-sampling.


PhotoShop Landscape resize dialogue box

Resizing Landscape orientation images

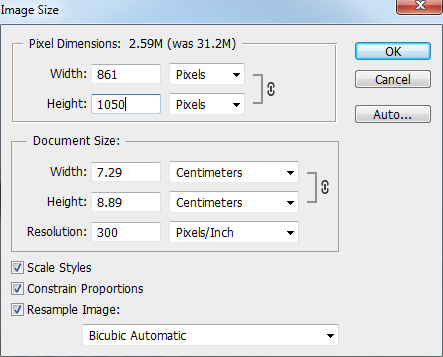
The technique for resizing landscape and portrait orientation photos is the same but which input box to use in the dialogue box differs. In PhotoShop, select Image Size from the Image menu.

The Image Size dialogue box will appear with a number of options for you to control how the image is down-scaled. Ensure the Constrain Proportions and Resample Image option boxes are checked. Move up to the Pixel Dimensions section, enter your required width and make sure that Pixels is selected in the drop down box. By changing the width for landscape shots, you are guaranteeing that the height of the image will be the height of or less than the vertical resolution of the projector if its resolution is XGA, SXGA or SXGA+ (in other words, it's a 4:3 aspect ratio)*.


Portrait resize dialogue box

Resizing Portrait orientation images

The workflow for portrait images is similar to landscape except instead of altering the Width field, change the Height field to the required vertical resolution. By setting the height, you ensure that the width of your image will fit within the horizontal resolution of the projector*.


Which Algorithm?

Photoshop (as of this writing) offers five different algorithm options for resizing your photos for camera club projectors.


  • Nearest Neighbor - The fast, most coarse option that Photoshop offers and not recommended for camera club projector presentation unless your computer hasn't kept up with the ever increasing size of camera files...
  • Bilinear - Photoshop's middle ground of sharpening, designed for up-scaling rather than down-scaling (so not used often any more) and produces medium quality results.
    PhotoShop Landscape resize dialogue box
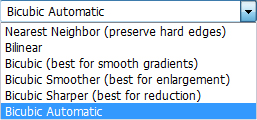
  • Bicubic - This is the most advanced of Photoshop's resizing algorithms (along with it's two variations below) and by using more surrounding pixels than Nearest Neighbor or Bilinear produces higher quality results with smoother tones.
  • Bicubic Smoother - Similar to Bicubic but optimised specifically for enlarging images, usually for large prints
  • Bicubic Sharper - For camera club projector presentations, web use and general on-screen work, this is the one to use. Optimised for down-sizing images but can produce sharpening artifacts (revert to Bicubic if this happens).
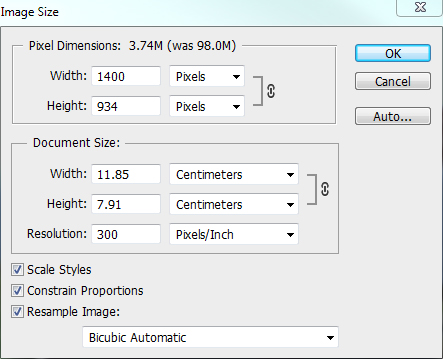
* The Complication: The introduction - and increasing prevalence - of widescreen 16:9 or 16:10 projectors and the parsity of high resolution 4:3 aspect ratio projectors now on the market have made the above routines fallible. For example, say you have a camera that produces an image of 5000×3333 (I've rounded that last number a bit) 3:2 aspect ratio image. If you have a 4:3 aspect ratio projector of SXGA+ resolution (such as the Canon XEED SX6000) then resizing the width to 1400 pixels gives a height of 934 pixels, within the native resolution of the projector. If however we have a WXGA projector (1280×800 resolution) then the image is still a higher resolution than the projector. In this case, set the Height of the image to the projectors native resolution and the Width will automatically alter as required.

Camera Club Projectors

For a list of the projectors we recommend for camera clubs please click here.


©Ken Davies, Ivojo Multimedia Ltd.

http://www.ivojo.co.uk

Friday 2 December 2011

HDMI Variations

We regularly get asked about the difference between the various HDMI standards so I thought I publish the brief definition from our glossary:

HDMI (High Definition Multimedia Interface) is designed for the easy transmission and control of video and - in the case of version 1.4 onwards - network signals. Version 1-1.2 supports 1920×1200 and 24-bit colour depth, version 1.3 adds 2560×1600 resolution and 48-bit colour (Deep Colour) and version 1.4 adds 4096×2160 (4k) resolution and networking. HDMI is backwards compatible with DVI.


Note that as of this writing there isn't much our there that will take advantage of HDMI 1.4 but Kramer do a number of HDMI 1.4 switches and distribution amplifiers.

©Ivojo Multimedia Ltd.
http://www.ivojo.co.uk

The JVC 3D Home Cinema Projectors

JVC have just launched the new DLA-X30, DLA-X70 and DLA-X90 home cinema and post production projectors and I thought a quick rundown of the projectors might be worth publishing as - in the flesh – they all look very similar.


First, the features they share in common:
  • 1920x1080 native resolution
  • 2D to 3D converter
  • 16-step aperture
  • 2x Zoom lens
  • 20Db noise level
  • 80% Vertical and 34% Horizontal Lens Shift
  • 3D Emitter and Glasses included
  • 2 HDMI Inputs
  • 1 Component (YPrBr) Input
  • 1 LAN Jack
  • 1 Screen Trigger socket

The Differences:

FeatureDLA-X30DLA-X70DLA-X90
4K resolution with e-shift Technology-
Brightness (ANSI Lumens)130012001200
Contrast50,000:180,000:1120,000:1
Colour Management7-axis7-axis
Colour Temperature (Xenon lamp mode)-
Picture Tone Adjustment-
Darkness and Lightness Correction-
Pixel Adjustment1 pixel increment1/16th pixel increment1/16th pixel increment
Screen Adjustment Modes3255255
THX Certification-THX 3DTHX 3D
ISF-
Anamorphic Mode
Initial Calibration--
Auto Calibration--
Picture Data In/Out--
Lens Memory
Motorised Lens Cover-
Analogue VGA Input-

4K Resolution with e-Shift Technology


JVC have developed a new technology called e-shift for their DLA-X70 and DLA-X90 projectors which allows them to shifts their panels slightly and use each pixel twice per frame, almost doubling the resolution to 3840x2160). This gives a noticeable increase in resolution when viewing high definition films, a real improvement done in hardware rather than using software scaling.

Xenon Lamp Mode


The DLA-X70 and X90 feature a Xenon Lamp colour temperature mode. This allows the projector to reproduce the same colour temperature and gamut as cinema projectors, making the new models even more like going to the cinema.

Lens Memory


All three projectors feature 3 lens memories which can be used to store zoom, focus and lens shift and instantly recalled depending on what aspect ratio of image you are watching (4:3, 16:9, 2.35:1 etc).

Click Here to see JVC's projector range for home cinema and post production.

©Ivojo Multimedia Ltd.
http://www.ivojo.co.uk

Thursday 1 December 2011

The Different Projection Technologies

For the projector buyers, the first choice you face is the choice of different technologies. Digital projectors broadly fall into two technology types, DLP from Texas instruments and LCD with its various derivatives, LCOS and D-ILA. 

DLP (Digital Light Processing)


DLP uses a Digital Micro-mirror Device (DMD) chip comprising thousands of micro mirrors, each of which corresponds with a pixel of the finished image. Each of these mirrors can be independently tilted to either reflect light towards the lens or away from the lens towards a light absorbing baffle. The easiest analogy is to think of each mirror being a light which is switched either on or off. The mirrors can tilt several thousand times per second so when an individual mirror is "on" more often than it is "off" we get more light reflected and when it's "off" more often than "on" we get less light reflected. This results in a lighter or darker shade of gray pixel. 

Adding Colour

The light reflecting off the DMD is - at this stage - in shades of gray and the next stage is to turn this image from grayscale to full colour. Between the DMD chips and the lens array is a wheel made up of coloured filter segments (red, green and blue in the simplest design). The colour wheel spins rapidly (50 times per second for a single speed wheel on a 50Hz supply) and the tilting of the mirrors is timed to allow light to either pass or not pass through each filter as the wheel rotates, producing a colour image. 

The "Rainbow" Effect

The result of this process is that DLP projectors build a colour image by displaying a series of static monochrome images. The rainbow effect - sometimes referred to as colour separation - occurs when the eye can detect these monochrome images in parts of the overall image produced. Most people are not susceptible to this problem but if you are then it can make single chip DLP projectors uncomfortable to watch. The problem has been somewhat alleviated recently with the development of faster colour wheels with more segments, causing the image to be refreshed more often each second.

LCD

LCD (Liquid Crystal on Silicon) is currently the most widely used projection technology in the world. Generally the systems used are made of 3 monochrome lcd panels, one each for red, green and blue. Light from the lamp passes through two dichroic mirrors, which separate the light into its primary colours. Each colour then shines on an lcd micro-screen, each pixel of which can either be "on", blocking light, or "off" allowing light through. The light that passes through enters a dichroic prism which re-combines the red, green and blue to produce a colour image which passes on to the projector lens. 

The "Chickenwire" or "Screen door" Effect

Until fairly recently people using LCD projectors have been able to see fixed pattern noise when viewing an image. This is the grid pattern made up of the gaps between individual pixels. As LCD technology has improved and resolutions have increased this artifact has become less and less of a problem. With high resolution lcd projectors it is reduced to the point where it can rarely - if at all - be seen from normal view distances. 

D-ILA and LCOS


D-ILA (Direct-drive Image Light Amplifier) is a development by JVC and is sometimes referred to as LCOS (Liquid Crystal On Silicon). D-ILA operates on a reflective rather than transmittive principal. In other words, the polarised light (red, green and blue) is reflected by D-ILA chip's rather than be transmitted through the LCD chips. The D-ILA device’s reflective technique involves laying out the pixel address selection section and the light modulation section liquid crystal in three dimensions. The entire surface, except for the insulation section between pixel electrodes, is used as a reflective surface, so a very high aperture ratio is possible (making D-ILA more efficient than other technologies). The primary benefit to consumers of D-ILA is the ability to produce high light output whilst retaining high contrast without relying on lens iris adjustment.


For a list Ivojo's projectors click www.ivojo.co.uk/projectors.


©Ivojo Multimedia Ltd. http://www.ivojo.co.uk
E3BA6CB3NV3E